In this post, we’ll cover the best practices for harvesting dill, ensuring that you get the most flavor and health benefits from this wonderful herb.
Understanding Dill’s Growth Stages
Before diving into the harvesting process, it’s essential to understand the growth stages of dill:
Germination: Dill seeds can germinate in as little as 7 to 14 days, depending on environmental conditions.
Seedling Stage: Once sprouted, dill seedlings grow rapidly, developing feathery leaves.
Vegetative Stage: After a few weeks, the plant matures, producing delicate, lacy leaves that can be harvested.
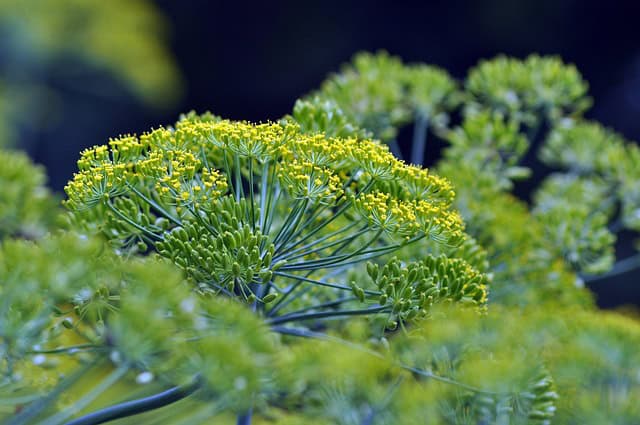
Flowering Stage: Dill plants will eventually produce yellow blooms, which attract beneficial insects and signal the plant’s maturity.
Note that harvesting timing and technique can depend on which part of the plant you intend to use—leaves, seeds, or flowers.
When to Harvest Dill
The ideal time to harvest dill depends on what you plan to use. Here is a breakdown:
Leaves: Begin harvesting dill leaves when the plant is about 6 to 8 inches tall. This is typically 8-10 weeks after planting. At this stage, the leaves are tender and flavorful.
Flowers: Dill flowers can be harvested just as the blooms start to open. These can be used in salads or as a garnish and have a slightly different flavor profile compared to the leaves.
Seeds: If you’re looking to harvest dill seeds, wait until the flowers have fully bloomed and turned brown, usually late summer to early fall. The seeds should be dark brown and easy to detach when ripe.
How to Harvest Dill
Tools Needed: You won’t need much—just a pair of sharp scissors or garden shears will do. If harvesting seeds, have a small container or paper bag ready.
Harvesting Leaves:
Selective Harvesting: Start by cutting the outer leaves first, allowing the center of the plant to continue to grow. This will promote new leaf growth.
Technique: Snip the leaves at the base, avoiding the stem if you want the plant to continue producing. Harvesting in the morning will yield the best flavor, as the leaves will be filled with moisture and aromatic oils.
Harvesting Flowers:
Harvest flowers in the morning when they are fully open, cutting the stem about 1 inch below the bloom. Use these fresh or dry for later use.
Harvesting Seeds:
Wait until the seed heads turn brown and feel dry to the touch. Cut the entire seed head, leaving a few inches of stem. Place the heads in a brown paper bag and allow them to dry further. Once they are fully dried, shake the bag gently to release the seeds.
Storing Dill
Freshly harvested dill can be stored in several ways:
Refrigeration: Place dill in a glass of water like a bouquet, cover loosely with a plastic bag, and keep it in the refrigerator. This method can keep it fresh for up to a week.
Freezing: To preserve flavor for longer, chop dill and freeze it in ice cube trays with water or olive oil. Once frozen, transfer the cubes to a freezer bag, and you’ll have ready-to-use dill for soups, stews, and sauces.
Drying: For dried dill, hang bundles in a cool, dark place until fully dried. Once dry, crumble the leaves into an airtight container and store away from light.
Conclusion
Harvesting dill is a straightforward yet satisfying task that allows you to enjoy the fresh flavors of this aromatic herb right from your garden.
By understanding the growth stages, knowing the right time to harvest, and employing proper techniques, you can maximize your dill’s potential.
Whether you use it fresh, dried, or in seed form, dill is sure to enhance your culinary creations. So get out there and enjoy the bounty of your dill plant—your taste buds will thank you!