In this extensive guide on “How To Grow Aloe Vera,” we’ll cover everything you need to become a successful Aloe Vera gardener, from its intriguing history to expert care tips tailored for both beginners and seasoned plant lovers.
The Fascinating History of Aloe Vera

Before diving into the practical aspects of growing Aloe Vera, understanding its origins can enrich your appreciation of this remarkable plant. Native to the Arabian Peninsula, Aloe Vera has been cultivated for thousands of years for its medicinal properties. Ancient Egyptians referred to it as the “plant of immortality,” and it featured prominently in their burial rites. Cleopatra herself was known to use Aloe Vera for its beauty-enhancing attributes.
In traditional medicine, Aloe Vera was heralded by various cultures, from the Greeks and Romans to traditional Chinese medicine practitioners. Its active compounds, including vitamins, minerals, and enzymes, have made it a sought-after ingredient in remedies for anything from sunburns to digestive issues. This historical context adds a layer of depth to our modern practices in growing and using Aloe Vera today.
Selecting the Right Variety of Aloe Vera

While the most popular variety is Aloe vera barbadensis miller, also known as medicinal Aloe Vera, there are several other types worth exploring. Each variety offers unique benefits, growth patterns, and appearances. When deciding which type to grow, consider how you plan to use your Aloe Vera.
Aloe Vera ‘Aloe Barbadensis Miller’ is distinguished by its long, fleshy leaves packed with gel and is ideal for skincare. Alternatively, ‘Aloe Vera Variegata’ showcases striking green and white striped leaves, making it a stunning ornamental choice, though it may not have the same medicinal properties.
For those interested in diversification, you might consider incorporating other species like ‘Aloe Saponaria’ or ‘Aloe Ferox.’ They present varying leaf shapes and dosages of sap that can enrich your gardening experience.
Ideal Conditions for Aloe Vera Growth
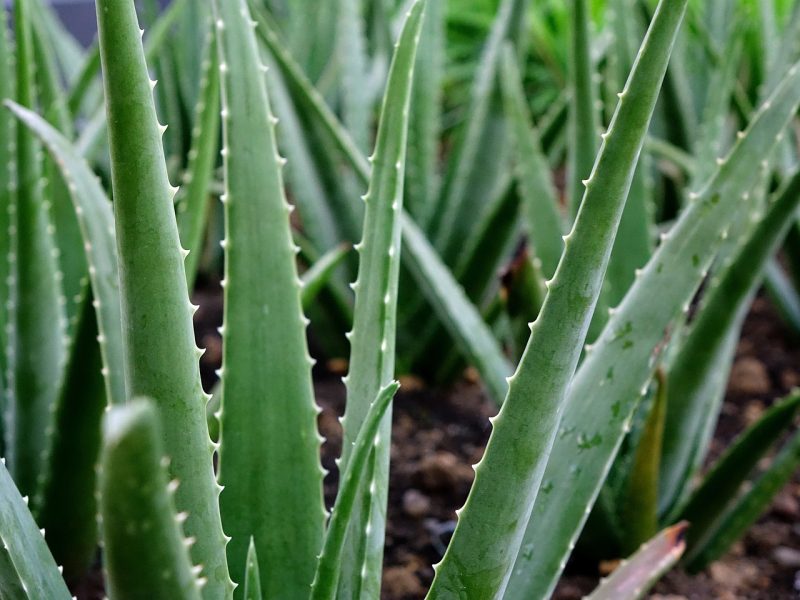
Aloe Vera thrives in conditions that mimic its native environment: warm, dry, and sunny. Understanding these conditions and setting them up in your home or garden is essential for successful cultivation.
Light Requirements
Aloe Vera loves sunlight. Ideally, aim for a location that receives at least six hours of indirect sunlight daily. Full direct sunlight can scorch the leaves, so a well-lit windowsill or a sheltered outdoor space is perfect. If you live in a region with intense sun, consider using sheer curtains to filter light.
Temperature and Humidity
Aloe Vera prefers warmer temperatures, ideally between 60°F and 75°F (15°C to 24°C). It can tolerate temperatures as low as 50°F (10°C), but prolonged exposure to cold can harm the plant. The humidity levels in your environment also play a critical role—Aloe Vera thrives in low humidity.
Soil Composition
Soil choice is vital. Aloe Vera requires well-draining soil to prevent root rot. A cactus mix or a combination of potting soil with sand or perlite works wonderfully. These mixtures promote drainage while retaining enough moisture during watering.
Pot Selection
When choosing a pot, opt for one with drainage holes to ensure excess water can escape. Terracotta pots are popular choices as they allow for breathability and help wick moisture away from the roots. Make sure your container is only slightly larger than the root ball to prevent the soil from becoming too wet.
Planting Aloe Vera: From Seed to Sapling

Starting your Aloe Vera journey can be done through seeds, offsets (pups), or cuttings. Each method has its unique advantages and challenges, so choose based on your preference and experience level.
Growing Aloe Vera from Seeds
Starting from seeds can be an exciting journey, although it requires patience. Begin by soaking seeds in water for about a day to enhance germination. Use a shallow tray filled with a well-draining soil mix, sprinkle the seeds on top, and cover them lightly.
Keep the soil moist but not soaked, and place the tray in a warm, bright area. Germination can take anywhere from two to four weeks. Once seedlings have developed a few sets of true leaves, they can be carefully transplanted into individual pots.
Offsets and Pups
The most beginner-friendly way to grow Aloe Vera is by using offsets, commonly referred to as pups. These are young plants that grow at the base of the parent plant. When the pups are about a third the size of the parent, they can be gently separated and repotted into their own containers.
Ensure that these pups have established roots before inserting them into their pots. It’s best to wait a few days after separation before watering to allow the cut surface to callus over, minimizing the risk of rot.
Leaf Cuttings
Leaf propagation is another method but can be less reliable. Choose a healthy leaf, cut it from the parent plant, and let it heal for a few days until a callus forms. After that, position it in the soil, keeping it upright. While this method may not work as consistently as the previous two, it can be worth trying for the adventurous gardener.
Care and Maintenance of Your Aloe Vera Plant

Growing Aloe Vera is relatively straightforward, but attentive care will ensure a flourishing plant. Practicing the right watering, fertilizing, and pruning methods makes all the difference.
Watering Regime
One of the most common mistakes new Aloe Vera owners make is overwatering. This succulent stores water in its leaves, making it highly drought-resistant. Allow the top inch of the soil to dry out before watering again. During the growing season (typically spring and summer), you may water every two to three weeks, while in winter months, reduce this frequency.
Fertilizing for Growth
While Aloe Vera does not require heavy feeding, a balanced fertilizer at half strength can provide essential nutrients during the growing season. Fertilizing should be done every four to six weeks in spring and summer but avoided during fall and winter.
Pruning and Maintenance
Taking care of your Aloe Vera plant also involves occasional pruning. Remove any dried or damaged leaves at the base, which not only beautifies the plant but helps redirect energy to new growth. If your Aloe Vera has grown significantly, consider repotting it into a larger container to accommodate its growth.
Troubleshooting Common Aloe Vera Problems
Even the most experienced gardeners can encounter issues with their Aloe Vera. Understanding potential problems allows you to act proactively, ensuring your plant continues to thrive.
Overwatering and Root Rot
As stated, overwatering is a common issue with Aloe Vera. If you notice yellowing leaves or mushy roots, root rot may have set in. To remedy this, allow the plant to dry out completely, and, if necessary, prune away any rotten roots and repot into dry, fresh soil.
Pests and Diseases
While Aloe Vera is generally resistant to pests, it can occasionally fall victim to aphids, mealybugs, and scale. Regularly inspect your plant; if you notice any pests, wipe them off with a soft cloth or use insecticidal soap as a mild treatment. Additionally, root rot can lead to diseases that show as blackened or mushy leaves.
Harvesting Aloe Vera: The Benefits of DIY

One of the delightful aspects of growing Aloe Vera is the ability to harvest its gel for personal use. This versatile substance can be applied topically for burns, abrasions, and hydration or mixed into juices, smoothies, or beauty products.
How to Extract Aloe Vera Gel
To extract the gel:
Choose a healthy outer leaf (the outer leaves contain the most gel).
Using a sharp knife, cut the leaf near the base.
Allow the leaf to sit upright in a bowl for about 15 minutes to let the yellow latex drain out (this latex can be irritating).
Next, cut both sides of the leaf to expose the gel and scoop it out with a spoon.
Store the extracted gel in an airtight container in the refrigerator for up to a week.
Benefits of Aloe Vera Gel
The benefits of Aloe Vera gel are vast:
Skin Health: Known for its ability to soothe sunburns, diminish the appearance of scars, and deeply moisturize the skin.
Digestive Aid: When ingested in moderation, it may help with digestion and gut health.
Nutritional Properties: Packed with vitamins C and E, Aloe Vera contributes to overall health.
Expanding Your Aloe Vera Collection: Companion Plants

Your gardening endeavors can extend beyond Aloe Vera. Pairing it with the right companion plants can enhance your garden’s aesthetic while fulfilling their unique growth needs. Consider robust succulents or cacti that share similar sunlight and watering requirements.
Succulent Mixes: Lavender and Echeveria can create a visually appealing contrast with Aloe Vera, and their watering needs align well.
Herbs: Basil and rosemary can also thrive in similar conditions and provide aromatic benefits alongside Aloe Vera.
Decorative Backdrops: Adding decorative rocks or sand can create texture and provide drainage when planting multiple species in one pot.
Aloe Vera in Different Cultures: Culinary and Medicinal Uses
The versatility of Aloe Vera extends into various cultures, offering insights into how this humble plant can embody rich culinary and medicinal traditions across the globe.
Culinary Uses
In various regions, Aloe Vera is used as a dietary supplement. For instance, in Asian cuisines, Aloe Vera juice is often added to smoothies, desserts, and salads for its refreshing flavor and health benefits. It’s important to note that only the gel inside the leaves is edible; the skin contains compounds that can be laxative.
Medicinal Insights
In Ayurvedic practices, Aloe Vera holds a revered place, often used in treatments for skin ailments and digestive health. Similarly, in Native American traditions, the plant was frequently employed for its soothing and anti-inflammatory properties. Such applications remind us of Aloe Vera’s dual role as both a gardening delight and a source of ancient wisdom.
Conclusion: The Bounty of Growing Aloe Vera
Embarking on the journey of growing Aloe Vera not only enriches your living space with greenery; it opens doors to a wealth of knowledge about plant care, health, and cultural significance. Each step of the planting, nurturing, and harvesting process deepens your connection to this remarkable succulent.